简介
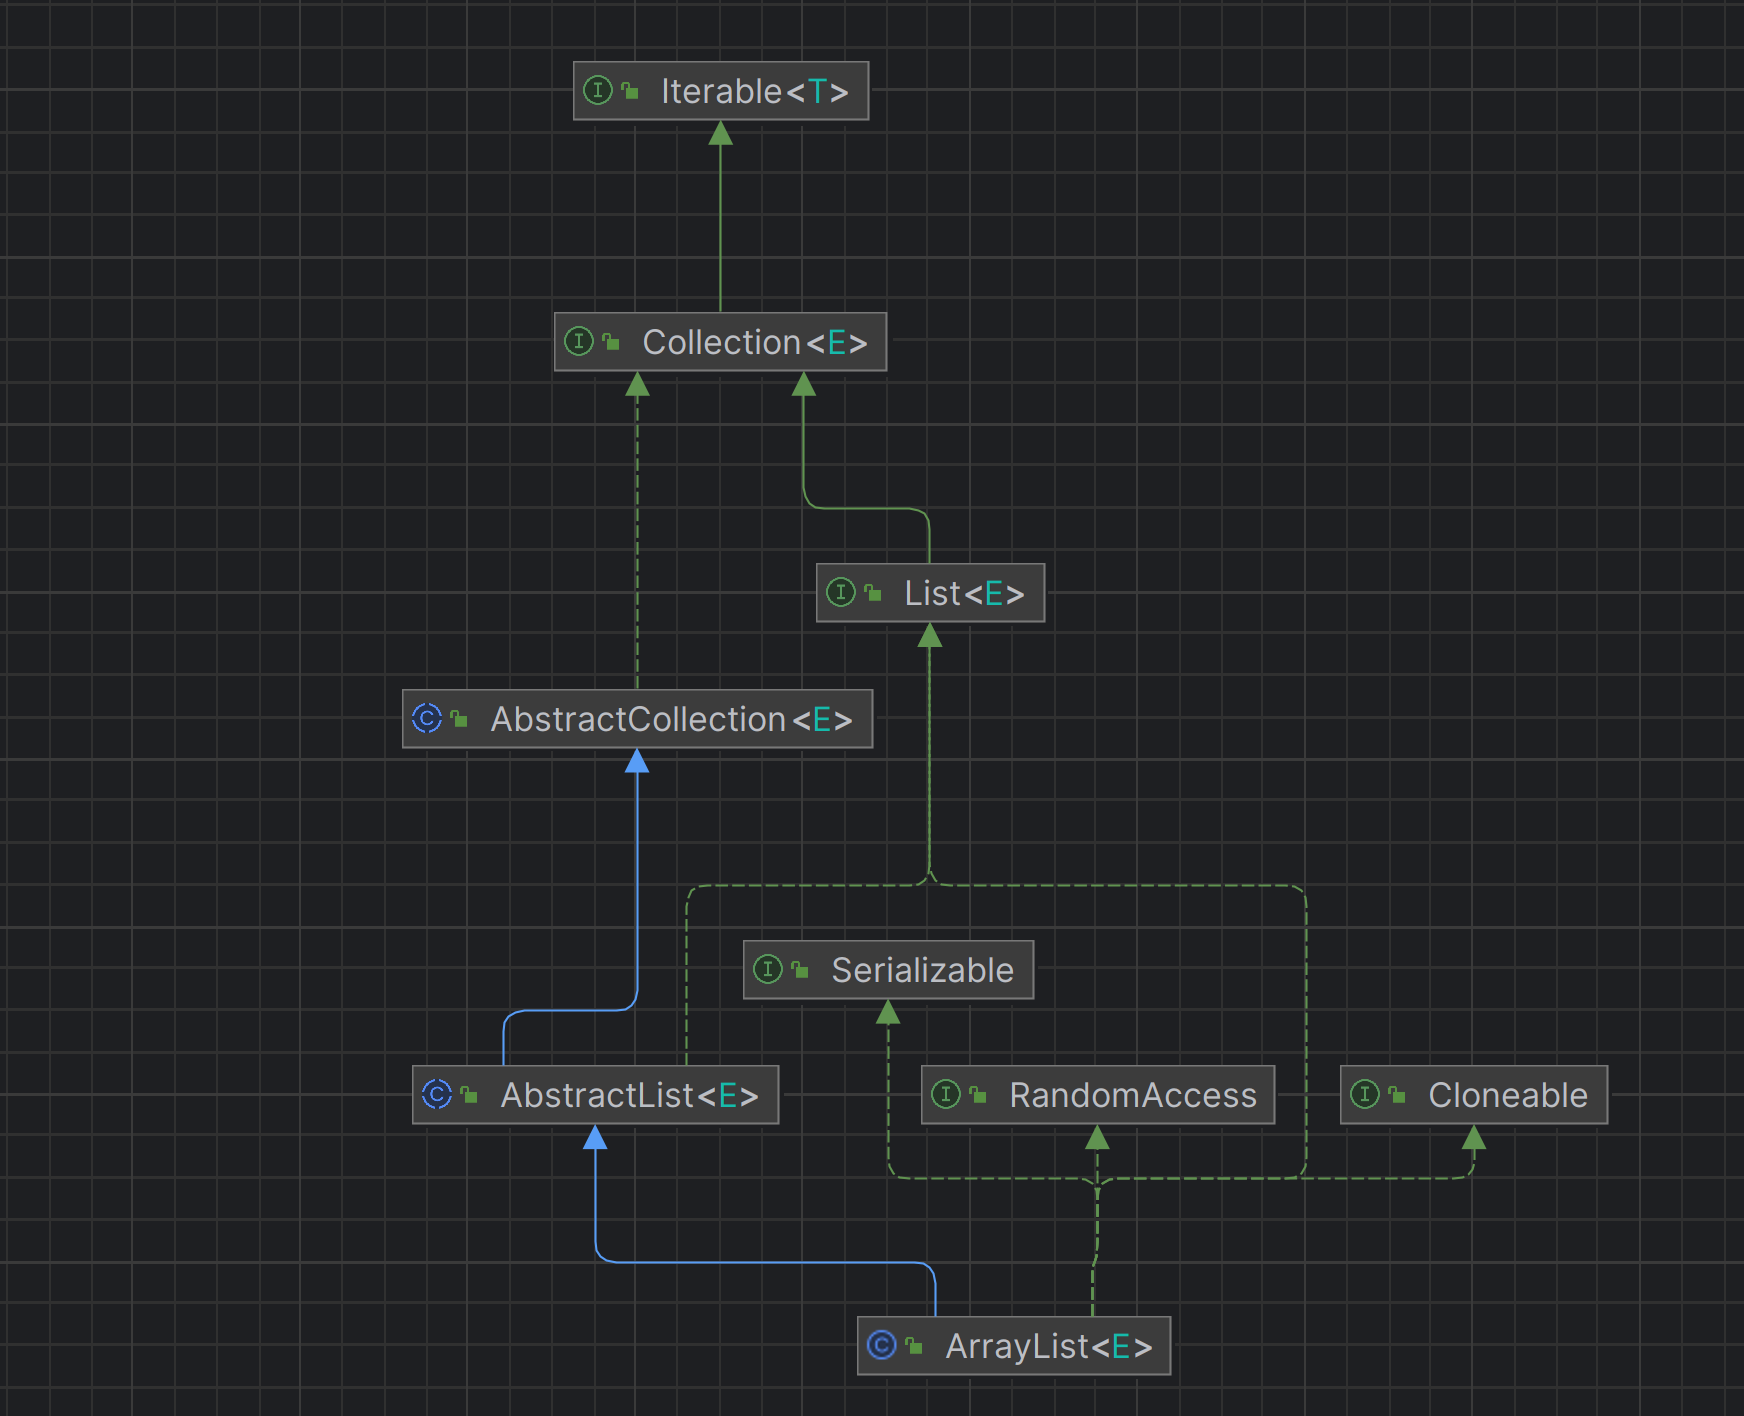
由于ArrayList类插入有序以及高性能的元素访问特性,使得它成为了我们最常用的一个集合类,我们先看下它的类图。可以看到它实现了以下几个接口
- List接口,意味着它是JAVA结合框架的一部分
- RandomAccess接口,说明ArrayList支持快速的随机访问,它内部任意位置的元素访问都是O(1)复杂度
- Cloneable接口,表示ArrayList是可以被克隆的
- java.io.Serializable接口,说明ArrayList是可以被序列化和反序列化的
重点属性
1
2
3
4
5
6
|
private static final int DEFAULT_CAPACITY = 10;
transient Object[] elementData;
private int size;
|
构造函数
1
2
3
4
5
6
7
8
9
10
11
12
13
14
15
16
17
18
19
20
21
22
23
24
25
26
27
28
29
30
31
|
public ArrayList() {
this.elementData = DEFAULTCAPACITY_EMPTY_ELEMENTDATA;
}
public ArrayList(int initialCapacity) {
if (initialCapacity > 0) {
this.elementData = new Object[initialCapacity];
} else if (initialCapacity == 0) {
this.elementData = EMPTY_ELEMENTDATA;
} else {
throw new IllegalArgumentException("Illegal Capacity: "+
initialCapacity);
}
}
public ArrayList(Collection<? extends E> c) {
Object[] a = c.toArray();
if ((size = a.length) != 0) {
if (c.getClass() == ArrayList.class) {
elementData = a;
} else {
elementData = Arrays.copyOf(a, size, Object[].class);
}
} else {
elementData = EMPTY_ELEMENTDATA;
}
}
|
关键方法
保存数据
add(E e)
在集合的尾部加入元素,如果数组已满则先触发一次扩容,再将数据添加到集合的尾部
1
2
3
4
5
6
7
8
9
10
11
12
13
14
15
16
17
| public boolean add(E e) {
modCount++;
add(e, elementData, size);
return true;
}
private void add(E e, Object[] elementData, int s) {
if (s == elementData.length)
elementData = grow();
elementData[s] = e;
size = s + 1;
}
|
add(int index, E element)
在指定的位置加入元素,原先位置的元素整体往后移一位。
1
2
3
4
5
6
7
8
9
10
11
12
13
14
| public void add(int index, E element) {
rangeCheckForAdd(index);
modCount++;
final int s;
Object[] elementData;
if ((s = size) == (elementData = this.elementData).length)
elementData = grow();
System.arraycopy(elementData, index, elementData, index + 1, s - index);
elementData[index] = element;
size = s + 1;
}
|
这里面需要注意的是System.arraycopy()方法,它是一个native修饰的方法,意味着我们看不到它具体实现细节,这里只做简单介绍。
1
2
3
4
5
6
7
8
9
10
11
12
|
@IntrinsicCandidate
public static native void arraycopy(Object src, int srcPos,
Object dest, int destPos,
int length);
|
addAll(Collection<? extends E> c)
将指定集合c的所有元素添加到当前集合的尾部。这里的c是Collection类型,意味着c可是任何实现了Collection接口的类,比如HashSet,LinkedList等等。
1
2
3
4
5
6
7
8
9
10
11
12
13
14
15
16
17
| public boolean addAll(Collection<? extends E> c) {
Object[] a = c.toArray();
modCount++;
int numNew = a.length;
if (numNew == 0)
return false;
Object[] elementData;
final int s;
if (numNew > (elementData = this.elementData).length - (s = size))
elementData = grow(s + numNew);
System.arraycopy(a, 0, elementData, s, numNew);
size = s + numNew;
return true;
}
|
设置数据
将指定位置的元素替换为element,并返回旧值。
1
2
3
4
5
6
7
8
9
10
11
12
| public E set(int index, E element) {
Objects.checkIndex(index, size);
E oldValue = elementData(index);
elementData[index] = element;
return oldValue;
}
E elementData(int index) {
return (E) elementData[index];
}
|
获取数据
1
2
3
4
5
6
7
8
9
10
| public E get(int index) {
Objects.checkIndex(index, size);
return elementData(index);
}
E elementData(int index) {
return (E) elementData[index];
}
|
删除数据
remove(int index)
删除指定位置的数据,并返回被删除的数据。
1
2
3
4
5
6
7
8
9
10
11
12
13
14
15
16
17
18
19
| public E remove(int index) {
Objects.checkIndex(index, size);
final Object[] es = elementData;
@SuppressWarnings("unchecked") E oldValue = (E) es[index];
fastRemove(es, index);
return oldValue;
}
private void fastRemove(Object[] es, int i) {
modCount++;
final int newSize;
if ((newSize = size - 1) > i)
System.arraycopy(es, i + 1, es, i, newSize - i);
es[size = newSize] = null;
}
|
remove(Object o)
删除集合中第一个内容等于o的数据,注意不是删除结合中所有等于o的元素哦。
1
2
3
4
5
6
7
8
9
10
11
12
13
14
15
16
17
18
19
20
21
| public boolean remove(Object o) {
final Object[] es = elementData;
final int size = this.size;
int i = 0;
found: {
if (o == null) {
for (; i < size; i++)
if (es[i] == null)
break found;
} else {
for (; i < size; i++)
if (o.equals(es[i]))
break found;
}
return false;
}
fastRemove(es, i);
return true;
}
|
removeAll(Collection<?> c)
删除当前集合中每个与c中内容相等的数据。
1
2
3
| public boolean removeAll(Collection<?> c) {
return batchRemove(c, false, 0, size);
}
|
retainAll(Collection<?> c)
删除当前集合中每个与c中内容相不等的数据。
1
2
3
| public boolean retainAll(Collection<?> c) {
return batchRemove(c, true, 0, size);
}
|
可以看到removeAll与retainAll方法都是调用的batchRemove方法,区别知识第二个参数不同,我们看下这个方法
1
2
3
4
5
6
7
8
9
10
11
12
13
14
15
16
17
18
19
20
21
22
23
24
25
26
27
28
29
30
| boolean batchRemove(Collection<?> c, boolean complement,
final int from, final int end) {
Objects.requireNonNull(c);
final Object[] es = elementData;
int r;
for (r = from;; r++) {
if (r == end)
return false;
if (c.contains(es[r]) != complement)
break;
}
int w = r++;
try {
for (Object e; r < end; r++)
if (c.contains(e = es[r]) == complement)
es[w++] = e;
} catch (Throwable ex) {
System.arraycopy(es, r, es, w, end - r);
w += end - r;
throw ex;
} finally {
modCount += end - w;
shiftTailOverGap(es, w, end);
}
return true;
}
|
扩容机制
我们知道ArrayList中数据是存放在一个数组中的,当数组已满并且需要继续往面来添加数据时,就需要先对数组进行扩容,以存放更多的数据。
有两个方法能触发自动扩容,分别是add()、addAll()、他们在添加数据时都会检查是否触发扩容,还有一个手动扩容的方式,即主动调用ensureCapacity() 方法。这三种方式的底层都是调用grow()方法来实现的。
1
2
3
4
5
6
7
8
9
10
11
12
13
14
15
| private Object[] grow(int minCapacity) {
int oldCapacity = elementData.length;
if (oldCapacity > 0 || elementData != DEFAULTCAPACITY_EMPTY_ELEMENTDATA) {
int newCapacity = ArraysSupport.newLength(oldCapacity,
minCapacity - oldCapacity,
oldCapacity >> 1 );
return elementData = Arrays.copyOf(elementData, newCapacity);
} else {
return elementData = new Object[Math.max(DEFAULT_CAPACITY, minCapacity)];
}
}
|
1
2
3
4
5
6
7
8
9
10
11
12
13
14
15
16
17
18
|
public static int newLength(int oldLength, int minGrowth, int prefGrowth) {
int prefLength = oldLength + Math.max(minGrowth, prefGrowth);
if (0 < prefLength && prefLength <= SOFT_MAX_ARRAY_LENGTH) {
return prefLength;
} else {
return hugeLength(oldLength, minGrowth);
}
}
|
快速失败机制
ArrayList中的操作都是非现成安全的,这意味着当多个线程对一个集合进行操作时,如果某一个线程通过迭代器(Iterator)在遍历集合的过程中,其他线程修改了集合的长度(增加或删除元素,不包括通过迭代器自身的方法修改集合),那么这个正在遍历的迭代器会立即抛出ConcurrentModificationException异常,这就是所谓的快速失败。
在ArrayList中,快速失败的实现主要依赖于一个叫做modCount的字段,这个字段用来记录ArrayList结构性修改的次数。结构性修改是指改变ArrayList大小,或者打乱ArrayList元素的顺序的操作。每当进行一次结构性修改,modCount就会增加1。 当获取ArrayList的迭代器并开始遍历时,会将当前的modCount值记录到迭代器的expectedModCount字段中。在每次迭代获取元素的过程中,都会检查modCount和expectedModCount是否相等,如果不相等,就会立即抛出ConcurrentModificationException。
1
2
3
4
| final void checkForComodification() {
if (modCount != expectedModCount)
throw new ConcurrentModificationException();
}
|


%20(%E5%B0%8F).jpg)
.jpg)