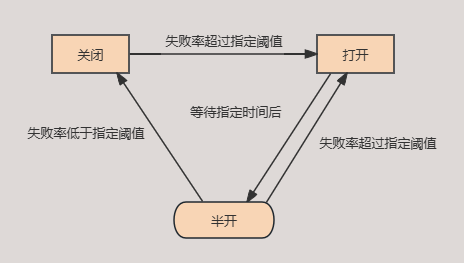
前言 断路器是一种服务保护机制,断路器通过有限状态机实现,有三个普通状态:关闭、开启、半开,还有两个特殊状态:禁用、强制开启。断路器默认是关闭状态,当满足条件时断路器会处于打开状态,此时不会再继续请求下游服务而是直接返回熔断逻辑。在一定时间后断路器会变成半开状态,这种状态下允许部分请求通过,然后依据这部分请求的结果判定断路器是转换为关闭还是打开。
状态的流转如下图所示:
断路器使用滑动窗口来存储和统计调用的结果。你可以选择基于调用数量的滑动窗口或者基于时间的滑动窗口。
基于访问数量的滑动窗口 基于访问数量的滑动窗口是通过一个有N个元素的循环数组实现。
如果滑动窗口的大小等于10,那么循环数组总是有10个统计值。滑动窗口增量更新总的统计值,随着新的调用结果被记录在环形数组中,总的统计值也随之进行更新。当环形数组满了,时间最久的元素将被驱逐,将从总的统计值中减去该元素的统计值,并该元素所在的桶进行重置。
基于时间的滑动窗口 基于时间的滑动窗口是通过有N个桶的环形数组实现。
如果滑动窗口的大小为10秒,这个环形数组总是有10个桶,每个桶统计了在这一秒发生的所有调用的结果(部分统计结果),数组中的第一个桶存储了当前这一秒内的所有调用的结果,其他的桶存储了之前每秒调用的结果。
滑动窗口不会单独存储所有的调用结果,而是对每个桶内的统计结果和总的统计值进行增量的更新,当新的调用结果被记录时,总的统计值会进行增量更新。
本次阅读的resilience4j版本为2.2.0,以基于访问数量的滑动窗口为例查看断路器的实现机制。
过程搭建 要想使用Resilience4j的功能,我们需要在原先工程的基础上添加上Resilience4j自己的配置。
添加依赖 1 2 3 4 5 6 7 8 9 10 11 12 <dependency> <groupId>org.springframework.boot</groupId> <artifactId>spring-boot-starter-actuator</artifactId> </dependency> <dependency> <groupId>org.springframework.boot</groupId> <artifactId>spring-boot-starter-aop</artifactId> </dependency> <dependency> <groupId>org.springframework.cloud</groupId> <artifactId>spring-cloud-starter-circuitbreaker-resilience4j</artifactId> </dependency>
添加配置 配置项有很多,具体的配置项可以参考官方文档。
1 2 3 4 5 6 7 8 9 10 resilience4j: circuitbreaker: configs: default: sliding-window-type: COUNT_BASED slidingWindowSize: 5 minimumNumberOfCalls: 2 permittedNumberOfCallsInHalfOpenState: 3 waitDurationInOpenState: 5s failureRateThreshold: 50
添加断路器注解 在指定的接口上添加@CircuitBreaker注解,可以直接加在接口层的方法上,也可以新建一个类,然后加在包装的方法上。
1 2 3 4 5 6 7 8 9 10 @Component public class ClientProviderBFacade { @Autowired private ClientProviderB clientProviderB; @CircuitBreaker(name = "backendA") public String hello2 (int code) { return clientProviderB.hello2(code); } }
这样一个简单的demo核心代码就完成了。简单测试一下,可以看到第三次是直接熔断了,耗时0毫秒,也就是说并没有真正的请求远程服务器。
1 2 3 4 5 6 7 8 2024-07-01T16 :38:51.284+08:00 DEBUG 31976 --- [CloudClientA] [nio-8080-exec-5] o.s.web.servlet.DispatcherServlet : GET "/hello2/1", parameters={} 2024-07-01T16 :38:51.285+08:00 DEBUG 31976 --- [CloudClientA] [nio-8080-exec-5] s.w.s.m.m.a.RequestMappingHandlerMapping : Mapped to org.example.cloudclient.consumer.ClientConsumerA#hello2(int) 2024-07-01T16 :38:51.285+08:00 DEBUG 31976 --- [CloudClientA] [nio-8080-exec-5] i.g.r.s.c.c.CircuitBreakerAspect : Created or retrieved circuit breaker 'backendA' with failure rate '50.0' for method: 'org.example.cloudclient.consumer.ClientProviderB#hello2' 2024-07-01T16 :38:51.286+08:00 DEBUG 31976 --- [CloudClientA] [nio-8080-exec-5] i.g.r.c.i.CircuitBreakerStateMachine : Event NOT_PERMITTED published: 2024-07-01T16:38:51.285418200+08:00[Asia/Hong_Kong]: CircuitBreaker 'ClientProviderBhello2int' recorded a call which was not permitted. 2024-07-01T16 :38:51.286+08:00 DEBUG 31976 --- [CloudClientA] [nio-8080-exec-5] i.g.r.c.i.CircuitBreakerStateMachine : CircuitBreaker 'backendA' succeeded: 2024-07-01T16 :38:51.286+08:00 DEBUG 31976 --- [CloudClientA] [nio-8080-exec-5] i.g.r.c.i.CircuitBreakerStateMachine : Event SUCCESS published: 2024-07-01T16:38:51.286417900+08:00[Asia/Hong_Kong]: CircuitBreaker 'backendA' recorded a successful call. Elapsed time: 0 ms 2024-07-01T16 :38:51.286+08:00 DEBUG 31976 --- [CloudClientA] [nio-8080-exec-5] m.m.a.RequestResponseBodyMethodProcessor : Using 'text/html', given [text/html, application/json, application/xhtml+xml, application/xml;q=0.9, */*;q=0.8] and supported [text/plain, */*, application/json, application/*+json] 2024-07-01T16 :38:51.286+08:00 DEBUG 31976 --- [CloudClientA] [nio-8080-exec-5] m.m.a.RequestResponseBodyMethodProcessor : Writing ["系统繁忙,请稍候再试"]
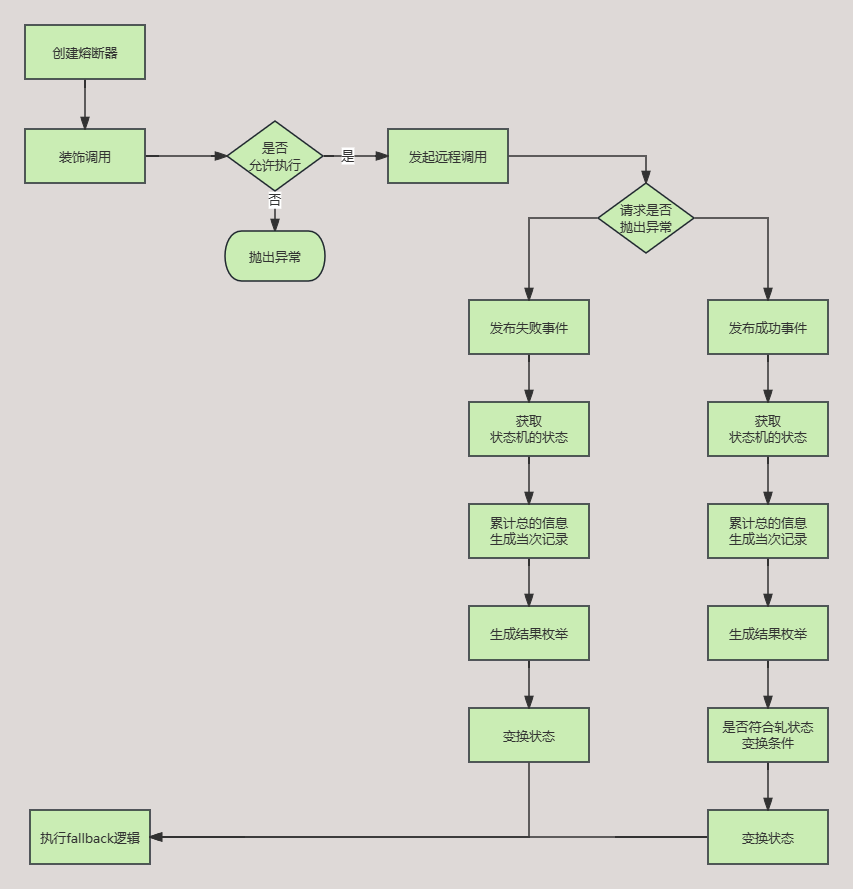
断路器的整体流程
断路器的实现原理 统计信息的记录形式 我们已经知道无论是基于访问数量还是基于时间实现的断路器机制,其内部存储是一个环形数组,那么我们就以FixedSizeSlidingWindowMetrics为例,看下它的内部实现。
1 2 3 4 5 6 7 8 private final int windowSize;private final TotalAggregation totalAggregation;private final Measurement[] measurements;int headIndex;
再看下它的构造器方法,可以看到它就是根据我们指定的滑动窗口大小,创建了对应大小的数组。
1 2 3 4 5 6 7 8 9 public FixedSizeSlidingWindowMetrics (int windowSize) { this .windowSize = windowSize; this .measurements = new Measurement [this .windowSize]; this .headIndex = 0 ; for (int i = 0 ; i < this .windowSize; i++) { measurements[i] = new Measurement (); } this .totalAggregation = new TotalAggregation (); }
那么为什么称它为环形数组呢?这就要看它的索引计算逻辑了。下标值 + 1 的结果值对滑动窗口大小取余,这意味着当结果值等于滑动窗口时headIndex为0。
1 2 3 void moveHeadIndexByOne () { this .headIndex = (headIndex + 1 ) % windowSize; }
然我们回过头来再看下TotalAggregation和Measurement这两个对象,发现他们都是继承自AbstractAggregation,只是TotalAggregation类中添加了removeBucket()方法,而Measurement类中则是reset()方法。
1 2 3 4 5 6 7 8 9 10 11 12 13 14 15 16 17 18 19 20 21 22 class TotalAggregation extends AbstractAggregation { void removeBucket (AbstractAggregation bucket) { this .totalDurationInMillis -= bucket.totalDurationInMillis; this .numberOfSlowCalls -= bucket.numberOfSlowCalls; this .numberOfSlowFailedCalls -= bucket.numberOfSlowFailedCalls; this .numberOfFailedCalls -= bucket.numberOfFailedCalls; this .numberOfCalls -= bucket.numberOfCalls; } } class Measurement extends AbstractAggregation { void reset () { this .totalDurationInMillis = 0 ; this .numberOfSlowCalls = 0 ; this .numberOfFailedCalls = 0 ; this .numberOfSlowFailedCalls = 0 ; this .numberOfCalls = 0 ; } }
继续看AbstractAggregation类的实现,它内部定义了一些字段用以记录请求的信息,然后定义了一个record()方法用以操作这些字段。
1 2 3 4 5 6 7 8 9 10 11 12 13 14 15 16 17 18 19 20 21 22 23 24 25 26 27 28 29 30 class AbstractAggregation { long totalDurationInMillis = 0 ; int numberOfSlowCalls = 0 ; int numberOfSlowFailedCalls = 0 ; int numberOfFailedCalls = 0 ; int numberOfCalls = 0 ; void record (long duration, TimeUnit durationUnit, Metrics.Outcome outcome) { this .numberOfCalls++; this .totalDurationInMillis += durationUnit.toMillis(duration); switch (outcome) { case SLOW_SUCCESS: numberOfSlowCalls++; break ; case SLOW_ERROR: numberOfSlowCalls++; numberOfFailedCalls++; numberOfSlowFailedCalls++; break ; case ERROR: numberOfFailedCalls++; break ; default : break ; } } }
具体是如何记录请求信息的? 现在我们看下一个请求具体是怎么累计以及插入到数组中去的。这就要重新回到FixedSizeSlidingWindowMetrics类了。
1 2 3 4 5 6 7 8 9 @Override public synchronized Snapshot record (long duration, TimeUnit durationUnit, Outcome outcome) { totalAggregation.record(duration, durationUnit, outcome); moveWindowByOne().record(duration, durationUnit, outcome); return new SnapshotImpl (totalAggregation); }
再看下moveWindowByOne(),这个方法主要负责获取并重置Measurement,还要将这个Measurement上的信息自汇总信息中移除。
1 2 3 4 5 6 7 8 9 10 11 private Measurement moveWindowByOne () { moveHeadIndexByOne(); Measurement latestMeasurement = getLatestMeasurement(); totalAggregation.removeBucket(latestMeasurement); latestMeasurement.reset(); return latestMeasurement; }
简单来说,它会记录汇总信息,记录此次结果的信息,然后返回一个快照版本的汇总信息。只是在记录此次信息的时候,他会将Measurement对象原有记录从汇总信息中移除,然后重置掉当前Measurement,最后再写入此次的记录信息到当前Measurement。
如何计算失败率的? 现在我们有了汇总的快照数据,再继续看下它是如何计算失败率的。把目光聚焦到CircuitBreakerMetrics类,它会用快照数据进行计算失败率、慢调用率等等。
我们从头开始看下这个类的流程。它的开始主要是上游调用的onSuccess()、onEerror()方法。
1 2 3 4 5 6 7 8 9 10 11 12 13 14 15 16 17 18 19 20 21 22 23 24 25 26 27 28 29 30 31 public Result onSuccess (long duration, TimeUnit durationUnit) { Snapshot snapshot; if (durationUnit.toNanos(duration) > slowCallDurationThresholdInNanos) { snapshot = metrics.record(duration, durationUnit, Outcome.SLOW_SUCCESS); } else { snapshot = metrics.record(duration, durationUnit, Outcome.SUCCESS); } return checkIfThresholdsExceeded(snapshot); } public Result onError (long duration, TimeUnit durationUnit) { Snapshot snapshot; if (durationUnit.toNanos(duration) > slowCallDurationThresholdInNanos) { snapshot = metrics.record(duration, durationUnit, Outcome.SLOW_ERROR); } else { snapshot = metrics.record(duration, durationUnit, Outcome.ERROR); } return checkIfThresholdsExceeded(snapshot); }
如何记录数据我们上面已经讲过,最终调用的是顶层抽象类中的record()方法。这里的重点是checkIfThresholdsExceeded()。
1 2 3 4 5 6 7 8 9 10 11 12 13 14 15 16 17 18 19 20 21 22 23 private Result checkIfThresholdsExceeded (Snapshot snapshot) { float failureRateInPercentage = getFailureRate(snapshot); float slowCallsInPercentage = getSlowCallRate(snapshot); if (failureRateInPercentage == -1 || slowCallsInPercentage == -1 ) { return Result.BELOW_MINIMUM_CALLS_THRESHOLD; } if (failureRateInPercentage >= failureRateThreshold && slowCallsInPercentage >= slowCallRateThreshold) { return Result.ABOVE_THRESHOLDS; } if (failureRateInPercentage >= failureRateThreshold) { return Result.FAILURE_RATE_ABOVE_THRESHOLDS; } if (slowCallsInPercentage >= slowCallRateThreshold) { return Result.SLOW_CALL_RATE_ABOVE_THRESHOLDS; } return Result.BELOW_THRESHOLDS; }
继续看计算失败率的逻辑,可以看到它是用快照对象来计算失败率的,计算逻辑也很只直接,就是总的失败次数处于总得调用次数,并将结果乘以100。
1 2 3 4 5 6 7 8 9 10 11 12 13 14 15 16 17 private float getFailureRate (Snapshot snapshot) { int bufferedCalls = snapshot.getTotalNumberOfCalls(); if (bufferedCalls == 0 || bufferedCalls < minimumNumberOfCalls) { return -1.0f ; } return snapshot.getFailureRate(); } @Override public float getFailureRate () { if (totalNumberOfCalls == 0 ) { return 0 ; } return totalNumberOfFailedCalls * 100.0f / totalNumberOfCalls; }
如何判断是否超过阈值的呢? 我们已经有失败率了,如何判断是否超限其实就在计算失败率的方法中。它就是根据失败率和慢调用率组合不同的情况来计算超限情况,结果返回的是一个Result的枚举值。
计算逻辑分为以下几种情况
失败率或慢调用率的值为-1,说明调用次数不够,不做熔断逻辑,返回Result.BELOW_MINIMUM_CALLS_THRESHOLD;
失败率大于等于失败率阈值并且慢调用率大于等于慢调用阈值,说明俩都超限了,返回Result.ABOVE_THRESHOLDS;
失败率大于等于失败率阈值,说明只有失败率超了,返回Result.FAILURE_RATE_ABOVE_THRESHOLDS;
慢调用率大于等于慢调用阈值,返回Result.SLOW_CALL_RATE_ABOVE_THRESHOLDS;
都不是,说明不超限,返回Result.BELOW_THRESHOLDS。
1 2 3 4 5 6 7 8 9 10 11 12 13 14 15 16 17 18 19 20 21 22 23 private Result checkIfThresholdsExceeded (Snapshot snapshot) { float failureRateInPercentage = getFailureRate(snapshot); float slowCallsInPercentage = getSlowCallRate(snapshot); if (failureRateInPercentage == -1 || slowCallsInPercentage == -1 ) { return Result.BELOW_MINIMUM_CALLS_THRESHOLD; } if (failureRateInPercentage >= failureRateThreshold && slowCallsInPercentage >= slowCallRateThreshold) { return Result.ABOVE_THRESHOLDS; } if (failureRateInPercentage >= failureRateThreshold) { return Result.FAILURE_RATE_ABOVE_THRESHOLDS; } if (slowCallsInPercentage >= slowCallRateThreshold) { return Result.SLOW_CALL_RATE_ABOVE_THRESHOLDS; } return Result.BELOW_THRESHOLDS; }
状态的流转原理 先看下上层的调用链路,来到CircuitBreaker接口中静态方法decorateCallable()。
1 2 3 4 5 6 7 8 9 10 11 12 13 14 15 16 17 18 19 20 21 22 static <T> Callable<T> decorateCallable (CircuitBreaker circuitBreaker, Callable<T> callable) { return () -> { circuitBreaker.acquirePermission(); final long start = circuitBreaker.getCurrentTimestamp(); try { T result = callable.call(); long duration = circuitBreaker.getCurrentTimestamp() - start; circuitBreaker.onResult(duration, circuitBreaker.getTimestampUnit(), result); return result; } catch (Exception exception) { long duration = circuitBreaker.getCurrentTimestamp() - start; circuitBreaker.onError(duration, circuitBreaker.getTimestampUnit(), exception); throw exception; } }; }
从这个方法可以看到,先走了是否允许发起远程调用的校验逻辑,然后 针对发起远程调用时是否抛出异常又分别调用了onResult()和onError()两个方法,我们继续看下这两个方法。
onResult() onResult()方法主要处理正常远程调用的情况。可以看到我们可以对结果进行断言,如果断言结果为真,那么也是将它归为一个失败调用,最后会调用onError()方法;否则就是调用onSuccess()方法处理访问成功的情况,然后再处理状态转移到逻辑。
1 2 3 4 5 6 7 8 9 10 11 12 13 14 15 16 17 18 19 20 21 22 @Override public void onResult (long duration, TimeUnit durationUnit, @Nullable Object result) { if (result != null && circuitBreakerConfig.getRecordResultPredicate().test(result)) { LOG.debug("CircuitBreaker '{}' recorded a result type '{}' as failure:" , name, result.getClass()); ResultRecordedAsFailureException failure = new ResultRecordedAsFailureException (name, result); publishCircuitErrorEvent(name, duration, durationUnit, failure); stateReference.get().onError(duration, durationUnit, failure); } else { onSuccess(duration, durationUnit); if (result != null ) { handlePossibleTransition(Either.left(result)); } } } @Override public void onSuccess (long duration, TimeUnit durationUnit) { LOG.debug("CircuitBreaker '{}' succeeded:" , name); publishSuccessEvent(duration, durationUnit); stateReference.get().onSuccess(duration, durationUnit); }
onError() 它用来处理远程调用失败的情况,大致流程如下:
首先检查配置中定义的ignoreExceptionPredicate,如果这个谓词对当前异常返回true,则认为这个异常应该被忽略,不会影响断路器的状态,只是记录日志并发布一个忽略异常的事件。
如果异常不被忽略,接下来会检查recordExceptionPredicate,看这个异常是否应该被记录为失败。如果是,会记录日志,发布一个错误事件,并更新断路器状态为错误。
如果异常既不被忽略也不被记录为失败,那么默认将其视为成功的一部分,记录相应的日志,发布成功事件,并更新状态为成功。
最后,无论异常被如何处理,都会调用handlePossibleTransition方法,根据当前的事件(异常)检查并处理可能的状态转换。
1 2 3 4 5 6 7 8 9 10 11 12 13 14 15 16 17 18 19 20 21 22 23 24 25 26 27 28 29 30 31 32 @Override public void onError (long duration, TimeUnit durationUnit, Throwable throwable) { if (throwable instanceof CompletionException || throwable instanceof ExecutionException) { Throwable cause = throwable.getCause(); handleThrowable(duration, durationUnit, cause); } else { handleThrowable(duration, durationUnit, throwable); } } private void handleThrowable (long duration, TimeUnit durationUnit, Throwable throwable) { if (circuitBreakerConfig.getIgnoreExceptionPredicate().test(throwable)) { LOG.debug("CircuitBreaker '{}' ignored an exception:" , name, throwable); releasePermission(); publishCircuitIgnoredErrorEvent(name, duration, durationUnit, throwable); return ; } if (circuitBreakerConfig.getRecordExceptionPredicate().test(throwable)) { LOG.debug("CircuitBreaker '{}' recorded an exception as failure:" , name, throwable); publishCircuitErrorEvent(name, duration, durationUnit, throwable); stateReference.get().onError(duration, durationUnit, throwable); } else { LOG.debug("CircuitBreaker '{}' recorded an exception as success:" , name, throwable); publishSuccessEvent(duration, durationUnit); stateReference.get().onSuccess(duration, durationUnit); } handlePossibleTransition(Either.right(throwable)); }
什么情况下状态会从关闭转到打开? 当前状态是关闭,并且失败率大于等于失败率阈值,或者慢调用率超大于等于慢调用阈值,那么此时会将状态从关闭转到打开。
关闭状态下的失败事件,那么我们就能定位到ClosedState#onError()方法,我们看下它的实现。
circuitBreakerMetrics.onError()会记录请求信息并最终返回一个Result的枚举值,表示超限的结果,前面我们已经看过这部分逻辑,所以我们看checkIfThresholdsExceeded()方法。
checkIfThresholdsExceeded()的主要逻辑是,如果判断出已经超限,并且通过CAS机制能将isClosed设置为false,那么就发布一个事件,然后将状态设置为open。
1 2 3 4 5 6 7 8 9 10 11 @Override public void onError (long duration, TimeUnit durationUnit, Throwable throwable) { checkIfThresholdsExceeded(circuitBreakerMetrics.onError(duration, durationUnit)); } private void checkIfThresholdsExceeded (Result result) { if (Result.hasExceededThresholds(result) && isClosed.compareAndSet(true , false )) { publishCircuitThresholdsExceededEvent(result, circuitBreakerMetrics); transitionToOpenState(); } }
判断是否超限的逻辑如下,代码比较简单,不做阐述。
1 2 3 4 5 6 7 8 9 10 11 12 public static boolean hasExceededThresholds (Result result) { return hasFailureRateExceededThreshold(result) || hasSlowCallRateExceededThreshold(result); } public static boolean hasFailureRateExceededThreshold (Result result) { return result == ABOVE_THRESHOLDS || result == FAILURE_RATE_ABOVE_THRESHOLDS; } public static boolean hasSlowCallRateExceededThreshold (Result result) { return result == ABOVE_THRESHOLDS || result == SLOW_CALL_RATE_ABOVE_THRESHOLDS; }
状态是如何从打开流转到半开的? 从打开流转到关闭,那么我们现在跳转到到OpenState,它有两种方式可以让状态从打开流转到半开,自动流转和被动流转。
自动流转 如果我们配置了automaticTransitionFromOpenToHalfOpenEnabled = true,那么就会在等待一段时间后(waitDurationInOpenState,默认值60000毫秒)自动流转到半开。
实现也很简单,就是在构造器中定义了一个定时器,延迟一段时间后自动执行toHalfOpenState()方法,将状态流转到半开。
1 2 3 4 5 6 7 8 9 10 11 12 13 OpenState(final int attempts, final long waitDurationInMillis, final Instant retryAfterWaitDuration, CircuitBreakerMetrics circuitBreakerMetrics) { if (circuitBreakerConfig.isAutomaticTransitionFromOpenToHalfOpenEnabled()) { ScheduledExecutorService scheduledExecutorService = schedulerFactory.getScheduler(); transitionToHalfOpenFuture = scheduledExecutorService .schedule(this ::toHalfOpenState, waitDurationInMillis, TimeUnit.MILLISECONDS); } else { transitionToHalfOpenFuture = null ; } isOpen = new AtomicBoolean (true ); }
被动流转 被动流转就是在请求过来后再判断是否满足流转条件,满足就调用toHalfOpenState()方法,将状态流转到半开。
首先也是在构造器中定义了一个retryAfterWaitDuration属性,这个属性是当前时间 + waitDurationInOpenState。然后再下个请求过来时,判断当前时间是否超过了retryAfterWaitDuration,超过了就流转到半开。
这段逻辑是维护在acquirePermission()方法中的。
1 2 3 4 5 6 7 8 9 10 11 12 13 14 15 16 17 18 19 @Override public void acquirePermission () { if (!tryAcquirePermission()) { throw CallNotPermittedException .createCallNotPermittedException(CircuitBreakerStateMachine.this ); } } @Override public boolean tryAcquirePermission () { if (clock.instant().isAfter(retryAfterWaitDuration)) { toHalfOpenState(); } circuitBreakerMetrics.onCallNotPermitted(); return false ; }
半开是如何流转到关闭或打开的? 现在让我们来到HalfOpenState中,看它是如何将状态流转到关闭或打开的。
我们配置了permittedNumberOfCallsInHalfOpenState = 3,即在半开状态下只允许三个请求发起远程调用,其它请求会直接抛出异常,走熔断逻辑,我们先看下这块儿的实现。
可以看到每次调用都会先对permittedNumberOfCalls做减法,直到减到0,此时就会抛出CallNotPermittedException异常。
1 2 3 4 5 6 7 8 9 10 11 12 13 14 15 16 17 @Override public boolean tryAcquirePermission () { if (permittedNumberOfCalls.getAndUpdate(current -> current == 0 ? current : --current) > 0 ) { return true ; } circuitBreakerMetrics.onCallNotPermitted(); return false ; } @Override public void acquirePermission () { if (!tryAcquirePermission()) { throw CallNotPermittedException .createCallNotPermittedException(CircuitBreakerStateMachine.this ); } }
再看状态流转到关闭或打开的逻辑。主要分为情况
通过CAS机制竞争到锁,并且失败或超时阈值超标,流转到打开状态
通过CAS机制竞争到锁,并且失败和超时阈值均不超标,流转到关闭状态
1
2
3
4
5
6
7
8
private void checkIfThresholdsExceeded (Result result) { if (Result.hasExceededThresholds(result) && isHalfOpen.compareAndSet(true , false )) { transitionToOpenState(); } if (result == BELOW_THRESHOLDS && isHalfOpen.compareAndSet(true , false )) { transitionToClosedState(); } }


%20(%E5%B0%8F).jpg)
.jpg)