前言
日常开发中,我们会在配置文件中配置一些属性,然后通过诸如@Value注解来使用它,我们这次就分析下Spring Boot是如何加载、解析的。
如何加载文件的?
在Spring Boot启动过程中会构建SpringApplication,这个过程中会加载一个监听器:EnvironmentPostProcessorApplicationListener,然后SpringApplication的prepareEnvironment()方法会发布一个事件,而这个时间会被EnvironmentPostProcessorApplicationListener监听到从而开始执行onApplicationEvent()方法,然后经过层层调用最终会调用Spring的方法去解析和加载资源文件中的属性,并最终将解析到的属性放入到Environment中,供后续使用。我们还是先通过一张图来对整个加载流程有个大概的认识。
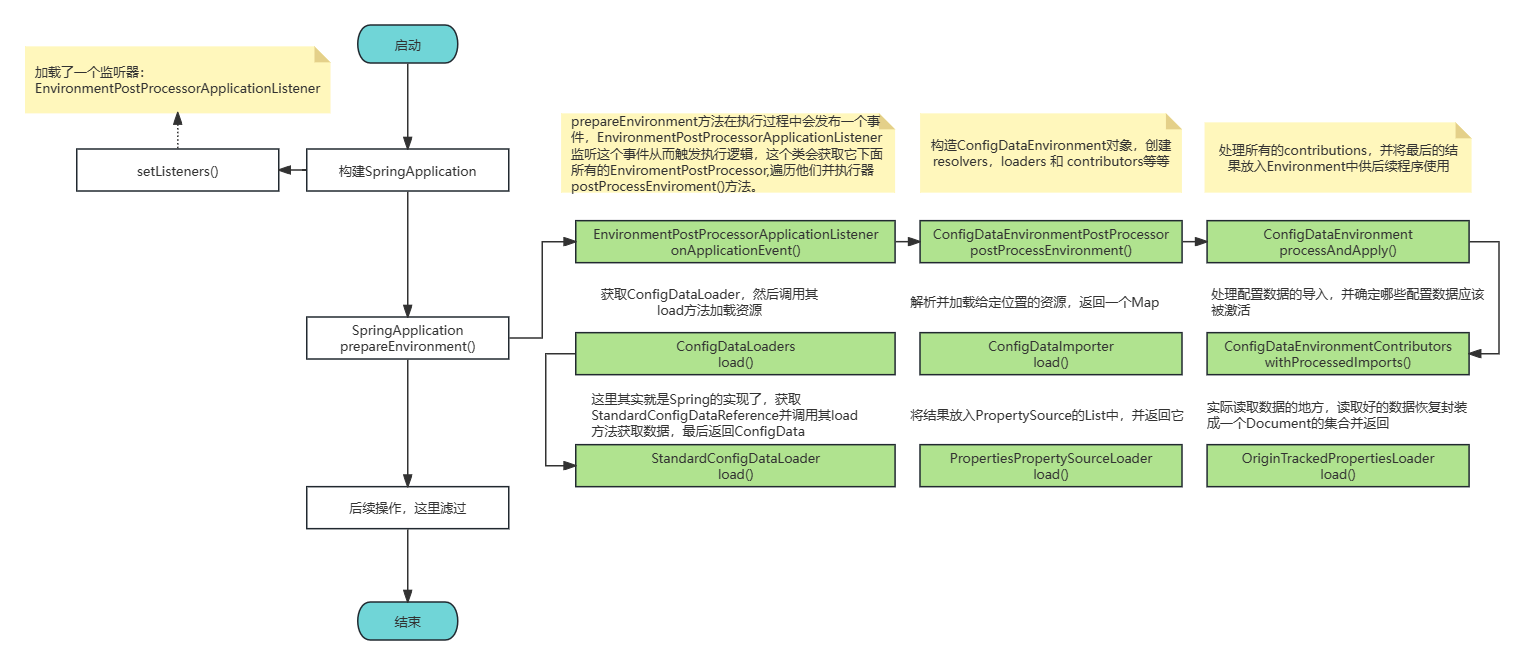
下面我们对每个步骤,都看一下他们的源码。
EnvironmentPostProcessorApplicationListener
这里的主要作用是根据接收到ApplicationEvent类型,执行不同的逻辑。然后获取EnvironmentPostProcessor并执行器postProcesEnviroment()方法。
1
2
3
4
5
6
7
8
9
10
11
12
13
14
15
16
17
18
19
20
21
22
23
| @Override
public void onApplicationEvent(ApplicationEvent event) {
if (event instanceof ApplicationEnvironmentPreparedEvent environmentPreparedEvent) {
onApplicationEnvironmentPreparedEvent(environmentPreparedEvent);
}
if (event instanceof ApplicationPreparedEvent) {
onApplicationPreparedEvent();
}
if (event instanceof ApplicationFailedEvent) {
onApplicationFailedEvent();
}
}
private void onApplicationEnvironmentPreparedEvent(ApplicationEnvironmentPreparedEvent event) {
ConfigurableEnvironment environment = event.getEnvironment();
SpringApplication application = event.getSpringApplication();
for (EnvironmentPostProcessor postProcessor : getEnvironmentPostProcessors(application.getResourceLoader(),
event.getBootstrapContext())) {
postProcessor.postProcessEnvironment(environment, application);
}
}
|
ConfigDataEnvironmentPostProcessor
构建ConfigurableEnvironment对象,然后调用它的processAndApply()方法。
1
2
3
4
5
6
7
8
9
10
11
12
13
14
15
16
17
18
| @Override
public void postProcessEnvironment(ConfigurableEnvironment environment, SpringApplication application) {
postProcessEnvironment(environment, application.getResourceLoader(), application.getAdditionalProfiles());
}
void postProcessEnvironment(ConfigurableEnvironment environment, ResourceLoader resourceLoader,
Collection<String> additionalProfiles) {
this.logger.trace("Post-processing environment to add config data");
resourceLoader = (resourceLoader != null) ? resourceLoader : new DefaultResourceLoader();
getConfigDataEnvironment(environment, resourceLoader, additionalProfiles).processAndApply();
}
ConfigDataEnvironment getConfigDataEnvironment(ConfigurableEnvironment environment, ResourceLoader resourceLoader,
Collection<String> additionalProfiles) {
return new ConfigDataEnvironment(this.logFactory, this.bootstrapContext, environment, resourceLoader,
additionalProfiles, this.environmentUpdateListener);
}
|
ConfigDataEnvironment
这个方法的主要作用是处理和应用配置数据,包括处理没有配置文件和有配置文件的 ConfigDataEnvironmentContributors,并将处理后的配置数据应用到环境中。
1
2
3
4
5
6
7
8
9
10
11
12
13
14
15
16
17
18
19
20
21
22
23
24
25
26
27
28
29
30
31
| void processAndApply() {
ConfigDataImporter importer = new ConfigDataImporter(this.logFactory, this.notFoundAction, this.resolvers,
this.loaders);
registerBootstrapBinder(this.contributors, null, DENY_INACTIVE_BINDING);
ConfigDataEnvironmentContributors contributors = processInitial(this.contributors, importer);
ConfigDataActivationContext activationContext = createActivationContext(
contributors.getBinder(null, BinderOption.FAIL_ON_BIND_TO_INACTIVE_SOURCE));
contributors = processWithoutProfiles(contributors, importer, activationContext);
activationContext = withProfiles(contributors, activationContext);
contributors = processWithProfiles(contributors, importer, activationContext);
applyToEnvironment(contributors, activationContext, importer.getLoadedLocations(),
importer.getOptionalLocations());
}
private ConfigDataEnvironmentContributors processInitial(ConfigDataEnvironmentContributors contributors,
ConfigDataImporter importer) {
this.logger.trace("Processing initial config data environment contributors without activation context");
contributors = contributors.withProcessedImports(importer, null);
registerBootstrapBinder(contributors, null, DENY_INACTIVE_BINDING);
return contributors;
}
|
ConfigDataEnvironmentContributors
这个方法的主要作用是处理配置数据的导入。它首先获取当前的导入阶段,然后遍历所有的 ConfigDataEnvironmentContributor,对每个 ConfigDataEnvironmentContributor 进行处理。如果 ConfigDataEnvironmentContributor 是未绑定的导入,那么就将其绑定到属性上;如果不是,那么就解析和加载配置数据的位置,然后将解析和加载的结果添加到 ConfigDataEnvironmentContributor 的子项中
1
2
3
4
5
6
7
8
9
10
11
12
13
14
15
16
17
18
19
20
21
22
23
24
25
26
27
28
29
30
31
32
33
34
35
36
37
38
39
40
41
| ConfigDataEnvironmentContributors withProcessedImports(ConfigDataImporter importer,
ConfigDataActivationContext activationContext) {
ImportPhase importPhase = ImportPhase.get(activationContext);
this.logger.trace(LogMessage.format("Processing imports for phase %s. %s", importPhase,
(activationContext != null) ? activationContext : "no activation context"));
ConfigDataEnvironmentContributors result = this;
int processed = 0;
while (true) {
ConfigDataEnvironmentContributor contributor = getNextToProcess(result, activationContext, importPhase);
if (contributor == null) {
this.logger.trace(LogMessage.format("Processed imports for of %d contributors", processed));
return result;
}
if (contributor.getKind() == Kind.UNBOUND_IMPORT) {
ConfigDataEnvironmentContributor bound = contributor.withBoundProperties(result, activationContext);
result = new ConfigDataEnvironmentContributors(this.logger, this.bootstrapContext,
result.getRoot().withReplacement(contributor, bound));
continue;
}
ConfigDataLocationResolverContext locationResolverContext = new ContributorConfigDataLocationResolverContext(
result, contributor, activationContext);
ConfigDataLoaderContext loaderContext = new ContributorDataLoaderContext(this);
List<ConfigDataLocation> imports = contributor.getImports();
this.logger.trace(LogMessage.format("Processing imports %s", imports));
Map<ConfigDataResolutionResult, ConfigData> imported = importer.resolveAndLoad(activationContext,
locationResolverContext, loaderContext, imports);
this.logger.trace(LogMessage.of(() -> getImportedMessage(imported.keySet())));
ConfigDataEnvironmentContributor contributorAndChildren = contributor.withChildren(importPhase,
asContributors(imported));
result = new ConfigDataEnvironmentContributors(this.logger, this.bootstrapContext,
result.getRoot().withReplacement(contributor, contributorAndChildren));
processed++;
}
}
|
ConfigDataImporter
1
2
3
4
5
6
7
8
9
10
11
12
13
14
15
16
|
Map<ConfigDataResolutionResult, ConfigData> resolveAndLoad(ConfigDataActivationContext activationContext,
ConfigDataLocationResolverContext locationResolverContext, ConfigDataLoaderContext loaderContext,
List<ConfigDataLocation> locations) {
try {
Profiles profiles = (activationContext != null) ? activationContext.getProfiles() : null;
List<ConfigDataResolutionResult> resolved = resolve(locationResolverContext, profiles, locations);
return load(loaderContext, resolved);
}
catch (IOException ex) {
throw new IllegalStateException("IO error on loading imports from " + locations, ex);
}
}
|
然后我们继续看load方法:
1
2
3
4
5
6
7
8
9
10
11
12
13
14
15
16
17
18
19
20
21
22
23
24
25
26
27
28
29
30
31
32
33
34
35
36
37
38
39
40
41
42
| private Map<ConfigDataResolutionResult, ConfigData> load(ConfigDataLoaderContext loaderContext,
List<ConfigDataResolutionResult> candidates) throws IOException {
Map<ConfigDataResolutionResult, ConfigData> result = new LinkedHashMap<>();
for (int i = candidates.size() - 1; i >= 0; i--) {
ConfigDataResolutionResult candidate = candidates.get(i);
ConfigDataLocation location = candidate.getLocation();
ConfigDataResource resource = candidate.getResource();
this.logger.trace(LogMessage.format("Considering resource %s from location %s", resource, location));
if (resource.isOptional()) {
this.optionalLocations.add(location);
}
if (this.loaded.contains(resource)) {
this.logger
.trace(LogMessage.format("Already loaded resource %s ignoring location %s", resource, location));
this.loadedLocations.add(location);
}
else {
try {
ConfigData loaded = this.loaders.load(loaderContext, resource);
if (loaded != null) {
this.logger.trace(LogMessage.format("Loaded resource %s from location %s", resource, location));
this.loaded.add(resource);
this.loadedLocations.add(location);
result.put(candidate, loaded);
}
}
catch (ConfigDataNotFoundException ex) {
handle(ex, location, resource);
}
}
}
return Collections.unmodifiableMap(result);
}
|
ConfigDataLoaders
主要是获取资源的加载器,然后使用加载器加载资源。
1
2
3
4
5
6
7
| <R extends ConfigDataResource> ConfigData load(ConfigDataLoaderContext context, R resource) throws IOException {
ConfigDataLoader<R> loader = getLoader(context, resource);
this.logger.trace(LogMessage.of(() -> "Loading " + resource + " using loader " + loader.getClass().getName()));
return loader.load(context, resource);
}
|
StandardConfigDataLoader
主要作用是加载标准配置数据资源,并返回一个ConfigData对象。
1
2
3
4
5
6
7
8
9
10
11
12
13
14
15
16
| @Override
public ConfigData load(ConfigDataLoaderContext context, StandardConfigDataResource resource)
throws IOException, ConfigDataNotFoundException {
if (resource.isEmptyDirectory()) {
return ConfigData.EMPTY;
}
ConfigDataResourceNotFoundException.throwIfDoesNotExist(resource, resource.getResource());
StandardConfigDataReference reference = resource.getReference();
Resource originTrackedResource = OriginTrackedResource.of(resource.getResource(),
Origin.from(reference.getConfigDataLocation()));
String name = String.format("Config resource '%s' via location '%s'", resource,
reference.getConfigDataLocation());
List<PropertySource<?>> propertySources = reference.getPropertySourceLoader().load(name, originTrackedResource);
PropertySourceOptions options = (resource.getProfile() != null) ? PROFILE_SPECIFIC : NON_PROFILE_SPECIFIC;
return new ConfigData(propertySources, options);
}
|
PropertiesPropertySourceLoader
加载资源,并将加载好的属性封装成PropertySource对象并放入List集合中返回。
1
2
3
4
5
6
7
8
9
10
11
12
13
14
15
16
17
18
19
20
21
22
23
24
25
26
27
28
29
30
| @Override
public List<PropertySource<?>> load(String name, Resource resource) throws IOException {
List<Map<String, ?>> properties = loadProperties(resource);
if (properties.isEmpty()) {
return Collections.emptyList();
}
List<PropertySource<?>> propertySources = new ArrayList<>(properties.size());
for (int i = 0; i < properties.size(); i++) {
String documentNumber = (properties.size() != 1) ? " (document #" + i + ")" : "";
propertySources.add(new OriginTrackedMapPropertySource(name + documentNumber,
Collections.unmodifiableMap(properties.get(i)), true));
}
return propertySources;
}
private List<Map<String, ?>> loadProperties(Resource resource) throws IOException {
String filename = resource.getFilename();
List<Map<String, ?>> result = new ArrayList<>();
if (filename != null && filename.endsWith(XML_FILE_EXTENSION)) {
result.add((Map) PropertiesLoaderUtils.loadProperties(resource));
}
else {
List<Document> documents = new OriginTrackedPropertiesLoader(resource).load();
documents.forEach((document) -> result.add(document.asMap()));
}
return result;
}
|
OriginTrackedPropertiesLoader
这个类是处理.properties结尾文件的,如果yml文件会有另外一个类处理,最终返回一个Document类型的List集合。其中Document内部有一个被声明为Map<String, OriginTrackedValue>的LinkedHashMap,以存储读取到的属性值。
1
2
3
4
5
6
7
8
9
10
11
12
13
14
15
16
17
18
19
20
21
22
23
24
25
26
27
28
29
30
31
32
33
34
35
36
37
38
39
40
41
42
43
44
45
| List<Document> load() throws IOException {
return load(true);
}
List<Document> load(boolean expandLists) throws IOException {
List<Document> documents = new ArrayList<>();
Document document = new Document();
StringBuilder buffer = new StringBuilder();
try (CharacterReader reader = new CharacterReader(this.resource)) {
while (reader.read()) {
if (reader.isCommentPrefixCharacter()) {
char commentPrefixCharacter = reader.getCharacter();
if (isNewDocument(reader)) {
if (!document.isEmpty()) {
documents.add(document);
}
document = new Document();
}
else {
if (document.isEmpty() && !documents.isEmpty()) {
document = documents.remove(documents.size() - 1);
}
reader.setLastLineCommentPrefixCharacter(commentPrefixCharacter);
reader.skipComment();
}
}
else {
reader.setLastLineCommentPrefixCharacter(-1);
loadKeyAndValue(expandLists, document, reader, buffer);
}
}
}
if (!document.isEmpty() && !documents.contains(document)) {
documents.add(document);
}
return documents;
}
|
继续看loadKeyAndValue方法,它通过loadKey()方法从IO中读取一个String类型的key,然后通过loadValue()方法从IO中读取value值并声明它为OriginTrackedValue,然后将key和value放入Document对象中。
1
2
3
4
5
6
7
8
9
10
11
12
13
14
15
16
17
18
19
20
21
22
23
| private void loadKeyAndValue(boolean expandLists, Document document, CharacterReader reader, StringBuilder buffer)
throws IOException {
String key = loadKey(buffer, reader).trim();
if (expandLists && key.endsWith("[]")) {
key = key.substring(0, key.length() - 2);
int index = 0;
do {
OriginTrackedValue value = loadValue(buffer, reader, true);
document.put(key + "[" + (index++) + "]", value);
if (!reader.isEndOfLine()) {
reader.read();
}
}
while (!reader.isEndOfLine());
}
else {
OriginTrackedValue value = loadValue(buffer, reader, false);
document.put(key, value);
}
}
|


%20(%E5%B0%8F).jpg)
.jpg)