前言 AbstractQueuedSynchronizer(AQS),翻译成中文为抽象队列同步器,是JAVA中很多类处理锁机制的底层方法,比如我们后面要讲的ReentrantLock、CountDownLatch、Semaphore等都是基于AQS来实现的。
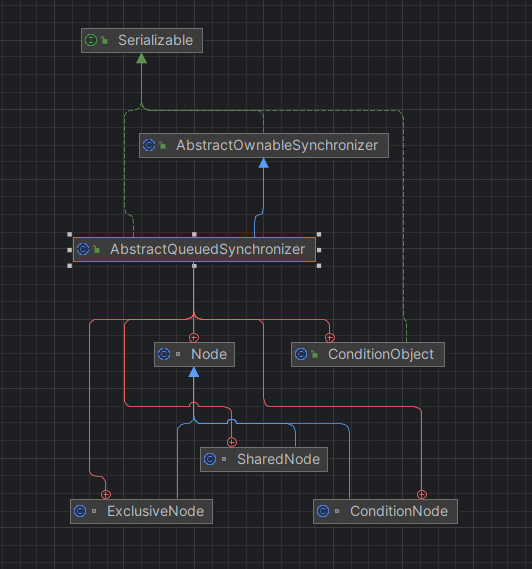
关键属性 1 2 3 4 5 6 7 8 9 10 11 12 13 14 15 16 17 18 19 20 21 22 23 24 25 26 private transient volatile Node head;private transient volatile Node tail;private volatile int state;static final int WAITING = 1 ; static final int CANCELLED = 0x80000000 ; static final int COND = 2 ; abstract static class Node { volatile Node prev; volatile Node next; Thread waiter; volatile int status; } static final class ExclusiveNode extends Node { }static final class SharedNode extends Node { }
关键方法 竞争锁 下面为首个节点获取锁并入队的逻辑,大致是获取锁,如果获取锁失败就进入队列,并使当前线程进入挂起状态。我为每步都标好了注释,然后我们通过两种情况描述一下执行流程
独占模式,进入队列前获取到了锁,此时就不进入队列了
S2 -> S2.2 -> S2.3
独占模式,未设置超时时间,成功进入队列
第一轮:S2 -> S2.2 -> S2.3 -> S3 // 构造Node
第二轮:S2 -> S2.2 -> S4 -> S4.1 // 初始化链表头部
第三轮:S2 -> S2.2 -> S4 -> S4.3 // 加入队列
第四轮:S2 -> S2.2 -> S6 // 更改Node status状态为等待中
第五轮:S2 -> S2.2 -> S7 -> S7.1 // 挂起线程
如果过了超时时间,或者被其它线程唤醒,假设这次获取到了锁并且是头部元素,那么会有最后一轮的遍历:
第六轮:S2 -> S2.2 -> S2.3 -> S2.3.1
1 2 3 4 5 6 7 8 9 10 11 12 13 14 15 16 17 18 19 20 21 22 23 24 25 26 27 28 29 30 31 32 33 34 35 36 37 38 39 40 41 42 43 44 45 46 47 48 49 50 51 52 53 54 55 56 57 58 59 60 61 62 63 64 65 66 67 68 69 70 71 72 73 74 75 76 77 78 79 80 81 final int acquire (Node node, int arg, boolean shared, boolean interruptible, boolean timed, long time) { Thread current = Thread.currentThread(); byte spins = 0 , postSpins = 0 ; boolean interrupted = false , first = false ; Node pred = null ; for (;;) { if (!first && (pred = (node == null ) ? null : node.prev) != null && !(first = (head == pred))) { if (pred.status < 0 ) { cleanQueue(); continue ; } else if (pred.prev == null ) { Thread.onSpinWait(); continue ; } } if (first || pred == null ) { boolean acquired; try { if (shared) acquired = (tryAcquireShared(arg) >= 0 ); else acquired = tryAcquire(arg); } catch (Throwable ex) { cancelAcquire(node, interrupted, false ); throw ex; } if (acquired) { if (first) { node.prev = null ; head = node; pred.next = null ; node.waiter = null ; if (shared) signalNextIfShared(node); if (interrupted) current.interrupt(); } return 1 ; } } if (node == null ) { if (shared) node = new SharedNode (); else node = new ExclusiveNode (); } else if (pred == null ) { node.waiter = current; Node t = tail; node.setPrevRelaxed(t); if (t == null ) tryInitializeHead(); else if (!casTail(t, node)) node.setPrevRelaxed(null ); else t.next = node; } else if (first && spins != 0 ) { --spins; Thread.onSpinWait(); } else if (node.status == 0 ) { node.status = WAITING; } else { long nanos; spins = postSpins = (byte )((postSpins << 1 ) | 1 ); if (!timed) LockSupport.park(this ); else if ((nanos = time - System.nanoTime()) > 0L ) LockSupport.parkNanos(this , nanos); else break ; node.clearStatus(); if ((interrupted |= Thread.interrupted()) && interruptible) break ; } } return cancelAcquire(node, interrupted, interruptible); }
释放锁 释放锁并通知下个Node。
1
2
3
4
5
6
7
8
9
10
11
12
13
14
15
16
public final boolean release (int arg) { if (tryRelease(arg)) { signalNext(head); return true ; } return false ; } private static void signalNext (Node h) { Node s; if (h != null && (s = h.next) != null && s.status != 0 ) { s.getAndUnsetStatus(WAITING); LockSupport.unpark(s.waiter); } }
Condition原理 用来替代传统的Object的wait()、notify()实现线程间的协作,相比使用Object的wait()、notify(),使用Condition中的await()、signal()这种方式实现线程间协作更加安全和高效。因此通常来说比较推荐使用Condition。
demo 这里使用ReentrantLock来写一个例子,从结果可以看到,线程1在调用await()方法后会被挂起,直到线程2通知后才继续执行:
1
2
3
4
5
6
7
8
9
10
11
12
13
14
15
16
17
18
19
20
21
22
23
24
25
26
27
28
29
30
31
32
33
34
35
36
37
38
39
40
public static void conditionTest () { Condition condition = lock.newCondition(); new Thread (() -> { try { lock.lock(); System.out.println("线程一加锁成功" ); System.out.println("线程一执行await被挂起" ); condition.await(); System.out.println("线程一被唤醒成功" ); } catch (Exception e) { e.printStackTrace(); } finally { lock.unlock(); System.out.println("线程一释放锁成功" ); } }).start(); new Thread (() -> { try { Thread.sleep(1000 ); lock.lock(); System.out.println("线程二加锁成功" ); condition.signal(); System.out.println("线程二唤醒线程一" ); } catch (InterruptedException e) { throw new RuntimeException (e); } finally { lock.unlock(); System.out.println("线程二释放锁成功" ); } }).start(); } 线程一加锁成功 线程一执行await被挂起 线程二加锁成功 线程二唤醒线程一 线程二释放锁成功 线程一被唤醒成功 线程一释放锁成功
关键属性 1 2 3 4 private transient ConditionNode firstWaiter;private transient ConditionNode lastWaiter;
我们再看一下ConditionNode,发现它是继承自父类的Node,只是多了一个自己的属性。
1 2 3 4 5 6 7 8 9 10 11 12 13 static final class ConditionNode extends Node implements ForkJoinPool .ManagedBlocker { ConditionNode nextWaiter; public final boolean isReleasable () { return status <= 1 || Thread.currentThread().isInterrupted(); } public final boolean block () { while (!isReleasable()) LockSupport.park(); return true ; } }
await方法 将当前线程的ConditionNode放入队列并释放锁,然后将自己挂起等待其它线程唤醒。在唤醒后再次尝试获取锁。
1 2 3 4 5 6 7 8 9 10 11 12 13 14 15 16 17 18 19 20 21 22 23 24 25 26 27 28 29 30 31 32 33 34 35 36 37 38 public final void await () throws InterruptedException { if (Thread.interrupted()) throw new InterruptedException (); ConditionNode node = new ConditionNode (); int savedState = enableWait(node); LockSupport.setCurrentBlocker(this ); boolean interrupted = false , cancelled = false , rejected = false ; while (!canReacquire(node)) { if (interrupted |= Thread.interrupted()) { if (cancelled = (node.getAndUnsetStatus(COND) & COND) != 0 ) break ; } else if ((node.status & COND) != 0 ) { try { if (rejected) node.block(); else ForkJoinPool.managedBlock(node); } catch (RejectedExecutionException ex) { rejected = true ; } catch (InterruptedException ie) { interrupted = true ; } } else Thread.onSpinWait(); } LockSupport.setCurrentBlocker(null ); node.clearStatus(); acquire(node, savedState, false , false , false , 0L ); if (interrupted) { if (cancelled) { unlinkCancelledWaiters(node); throw new InterruptedException (); } Thread.currentThread().interrupt(); } }
我们看下enableWait(node)方法,它主要负责入队列和释放锁。
1
2
3
4
5
6
7
8
9
10
11
12
13
14
15
16
17
private int enableWait (ConditionNode node) { if (isHeldExclusively()) { node.waiter = Thread.currentThread(); node.setStatusRelaxed(COND | WAITING); ConditionNode last = lastWaiter; if (last == null ) firstWaiter = node; else last.nextWaiter = node; lastWaiter = node; int savedState = getState(); if (release(savedState)) return savedState; } node.status = CANCELLED; throw new IllegalMonitorStateException (); }
signal方法 1 2 3 4 5 6 7 8 9 10 11 12 13 14 15 16 17 18 19 20 21 22 23 24 25 26 27 28 29 30 31 32 33 34 35 36 37 38 39 public final void signal () { ConditionNode first = firstWaiter; if (!isHeldExclusively()) throw new IllegalMonitorStateException (); if (first != null ) doSignal(first, false ); } private void doSignal (ConditionNode first, boolean all) { while (first != null ) { ConditionNode next = first.nextWaiter; if ((firstWaiter = next) == null ) lastWaiter = null ; if ((first.getAndUnsetStatus(COND) & COND) != 0 ) { enqueue(first); if (!all) break ; } first = next; } } final void enqueue (Node node) { if (node != null ) { for (;;) { Node t = tail; node.setPrevRelaxed(t); if (t == null ) tryInitializeHead(); else if (casTail(t, node)) { t.next = node; if (t.status < 0 ) LockSupport.unpark(node.waiter); break ; } } } }


%20(%E5%B0%8F).jpg)
.jpg)